Learn How to Use a Sewing Machine for Beginners
We have compiled an easy guide to help you in using your sewing machine. This will have you sewing like a pro in the future. But first we start with the basics.
Learn How to Use a Sewing Machine for Beginners – Getting to know your machine
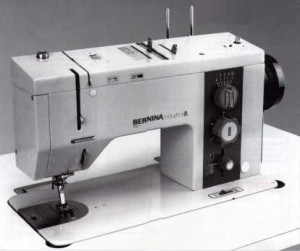
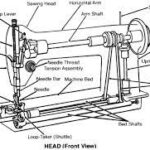
Before you can even start to sew, the first thing you need to do is familiarize yourself with your machine and its parts. You need to know this in order to understand what they do. This will make it easier for you to follow the guide in using your sewing machine.
Different sewing machines will look different from each other and some parts may not be in the same position as other machines. Also, for more basic sewing machines, some features may not be included. However, sewing machines will have generally similar parts and you can still determine which is which. We have listed some of the important parts that you need to be familiar with in order to operate your machine.
- Power Switch. This may seem silly but you have to be familiar where the power switch is. This is essential for your safety. Remember to always switch off your machine when not in use or when handling the needle.
- Spool Holder/Pin. This is what holds your thread (spool) and is located on top of your machine.
- Bobbin Winder. This is the smaller pin also located on top of your machine. This is used to wind your bobbin when you need to put in new thread.
- Stitch Adjustment. These will look different in every sewing machine. Some will have dials while the more high tech models will have buttons or even touch screen functions. The stitch adjustment lets you control the length, width and type of stitch.
- Presser Foot & Lever. This is what holds the cloth in place when you sew. This is located beneath your needle. The lever allows you to raise the presser foot.
- Feed Dog. This is the guide that allows the fabric to move as it is being sewn.
- Needle. This is apparently the sharp pin that is used to sew.
- Tension Dial. This lets you control the tightness of your thread.
- Bobbin Case and Release. This is where your bobbin is located. You will need to replenish the thread in your bobbin from time to time so it is essential that you know where it is located.
- Hand Wheel. This is the wheel located at the rightmost part of your machine. This allows you to slowly move your needle up and down.
- Foot Pedal. This is the control by which allows you to sew. This can either be mechanical or electric.
How to Use a Sewing Machine – Setting It Up
Now that you are familiar with the parts in your machine, you can now more or less understand how your machine works. You can already go to the next step to use your machine. This is setting up your machine so that it will be ready for use.
- Set your machine where there is ample space and light for you to work in. You should have enough space where you can cut and work with your fabric. Good lighting is also very important in your workplace.
- Make sure the needle is secured properly. Take extra caution when handling your needle. Make sure that it is securely fastened. If it feels a bit loose, insert the needle all the way up and tighten the screw that holds it in place. You may need to change needles depending on the kind of fabric you will be working on. Refer to your supplier for the proper needles to use in different fabrics.
- Wind the bobbin. Make sure that you have thread in your bobbin. Otherwise, you need to wind it. When sewing, there are two sources of thread. One is coming from the spool which is located on top of your machine. The other source is from your bobbin located beneath your needle plate and supplies the thread for the underside stitch. When winding your bobbin, you need to secure the bobbin on the bobbin pin. The thread will come from the spool which is placed on the spool pin. Pull the thread left from the spool and wind it around the winding disc which is also on top of the machine and pull the thread to the right towards the bobbin. Wrap the thread a couple of times around the bobbin before winding your bobbin. This can be done by pressing on the foot pedal or pressing the winding button.
- Thread your machine. Once you have thread on your bobbin, you can now complete threading your machine. You have to thread both the spool and your bobbin. When threading your spool, first make sure that your spool is on the spool pin. Pull the thread to the left towards the left. You will have a thread guide in your machine that directs you where to pass the thread through until it is finally being threaded on the needle. When threading your bobbin, make sure that the bobbin is back in its case and secured beneath the needle where it is located. Once it is done, close the needle plate and turn the hand wheel so your needle will move down and then back up. When it goes back up, it will bring the thread from the bobbin up also. Pull both thread from your bobbin and spool.
How to Use a Sewing Machine for Practice
Now that your sewing machine is ready to use, all you need to do is try a few practice stitches to get the feel of your machine. What you need to learn now is how to feed the fabric into your machine, choosing the right stitches and making adjustments, and finally how to get the machine to actually sew. It sounds fairly easy doesn’t it?
Try following the steps below in making your first few stitches:
- Select the stitch that you want. You can choose from different kinds of stitches and adjust the length and width of the stitch.
- Raise the presser foot to allow the fabric to slide beneath the needle.
- Line the fabric accordingly under the needle. Allow enough margin on the sides.
- Lower the presser foot to hold the fabric securely in place.
- Slowly move the needle up and down by using the hand wheel. While doing so, hold on to both ends of the thread to keep it from retreating into the fabric. Once a few stitches have been done to hold the thread securely in place, stop turning the hand wheel.
- Slowly press the foot pedal to get the feel of the rhythm. Hold your fabric so it won’t move from side to side. Congratulations you are now sewing!
Keep repeating the practice guide above with the different stitches available. Once you have mastered on how to use a sewing machine, you can create your very first sewing project. But always remember your safety when sewing. Be mindful of the direction of the needle and turn your machine off when not in use.