How to clean, oil and thread an older style Bernina Nova 900 sewing machine.
You can find a copy of the manual available for immediate download:
This video also outlines the steps to help you get your machine up and running:
https://youtu.be/gLrUeC9_hXw
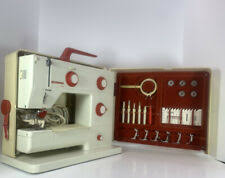
The Bernina Nova 900 is an older style Bernina Sewing Machine that uses an external bobbin case, instead of the drop-in type like the newer Bernina models.
Here are instructions for cleaning your Bernina Nova 900 sewing machine.
Step 1: Disconnect the electrical cord from the wall outlet and remove any bobbins or projects in progress to prevent accidentally running over them with parts of your Bernina Nova. Make sure to unplug it, this computerized Bernina will not run without connecting the plug into a working wall outlet!
STEP 2: Remove any dust covers on either side of the machine. Be careful when doing this because there are several springs inside which can pop out if you’re not careful.
STEP 3: Remove the front of the Bernina Nova 900 by opening the information information cover located on your Bernina’s face plate. This will allow you to get at some of the screws holding on your Bernina back faceplate. There is likely quite a bit of lint and dirt in this area which you can now take care of!
STEP 4: Once you’ve opened up these two side panels, locate all of the visible screws (there should be 5 on each side) that hold your Bernina Nova back plate on. At this point, go ahead and remove them with either an appropriate screwdriver or Bernina supplied Bernette screwdriver (again for me, I had misplaced mine after sewing machine college and was using a Bernina 800 screwdriver, which actually fit perfectly!
STEP 5: Now remove the Bernina face plate. It will pull up easily and expose more screws. Unscrew those as well and set them aside so you won’t lose them.
STEP 6: At this point we can carefully disassemble our Bernina Nova 900 back into two halves (unfortunately the cord is screwed into one half of your Bernina Nova making it impossible to completely take apart). There are particular screws that attach each half of the Bernina to each other in various places, but these are all pretty obvious once you’ve taken out most of your machine’s back cover. I recommend taking photo’s for reference purposes later if you’re not experienced with Bernina’s.
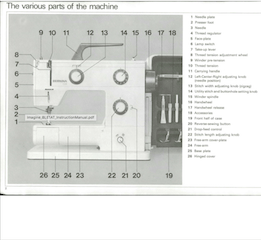
STEP 7: Now that we have removed the Bernina Nova back plate, you should be able to see your Bernina’s internal workings from here on out. There are a few vital places where oil must be applied to keep your Bernina sewing machine working in tip top shape!
Here is a list of all of these places and what I recommend using for oiling purposes:
– Bernina screw hole (where the Bernina handle attaches)- 3 in 1 oil or equivalent light weight machine oil, you want something that won’t attract lint over time
– Bernette bobbin case which holds the bobbins – 3 in 1 Oil or equivalent light weight machine oil. You can also use Bernette bobbin case grease (I’ve never used this particular grease, but if you want to replace Bernina’s grease with Bernette’s Bernina 930 oil , it works the same)
– Bernina hook – A drop of oil here will make your Bernina Nova run like a dream. Be sure not to over lubricate the hook because excess oil will collect lint! Just be liberal with your oiling and give it 2 or 3 drops.
– Bernina reverse lever – Using a cotton swab dipped in light weight machine oil, carefully go around where the 4 screws attach this part so that none of them are dry. NOTE: The Bernina reverse lever has metal on metal contact, only use a drop or two of oil here. Too much oil will cause Bernina reverse lever to slip and won’t engage properly.
– Bernina sewing machine needle bar – Using a cotton swab, do the same with your Bernina needle bar as you did for your Bernina reverse lever (only use 1 drop of oil here).
STEP 8: Cleaning! Get out your vacuum cleaner and go over all visible areas where lint can accumulate. Lint is Berninas worst enemy!!! I use my little hand held Bernette on both my bernina nova 900 and my bernina 1007 whenever I’m done sewing to clean out the bobbin area. You can also use a Bernini cleaning brush kit . These are great for Bernina’s.
STEP 9: Let your Bernina Nova dry for about 10 minutes before replacing Bernina face plate and working on it again. Once the Bernina Nova is dry, go ahead and replace any screws you may have taken out during disassembly. If there are no screws left holding your Bernina Nova back cover together, now is a good time to find them all (locate your Bernina screwdriver) and reassemble with Bernina Nova screws that hold it together!
STEP 10: Now that your Bernina Nova is all clean, oiled and threaded it’s time to put Bernette bobbin case back together. This can be challenging because most Bernina bobbin cases are over 30 years old!
To make things easier on yourself, carefully follow these instructions: Take off the front half of your Bernette bobbin case (the part with the screw hole in it) by pushing down on one side of the spring with a flat head screwdriver while pulling up on the other side. The front half should pop right out. Next place your Bernette bobbin case front half on a flat surface and with Bernina 930 oil or Bernina grease, carefully smear it all over the inside of your Bernette bobbin case. Be sure to get Bernette bobbin case grease into that little channel where Bernette bobbins fit… this will make Bernettes push in like they’re supposed to (so you don’t have to press as hard as you normally would). Finally, reinsert back piece of Bernette bobbin case which attaches with a screw.
NOTE: NEW BERNINA NEWA 900 AND BERNINA 1007 MACHINES DON’T USE A SCREW ATTACHED BERNETTE CASE! THEY JUST IN AND ARE HELD DOWN BY A METAL HEAD LAYING UNDER YOUR BERNINA NOVA 900 FACE PLATE!!!
BONUS STEP: Bernina flat bed [optional] – It might be a good idea to clean and oil Bernina flat bed of your Bernina Nova (if your Bernina nova has this feature). If you do, This is how you would go about doing that: Remove Bernina face plate by putting Bernina screwdriver into little hole on Bernette face plate and prying it off. Once Bernette face plate is removed, you will see what looks like a small white gear box… open up the top panel of this box and very carefully use cotton swab with light weight machine oil or 3 in 1 Oil to oil Bernina flat bed of your Bernina Nova. Be sure not to over oil Bernina flat bed, just a few drops! I can’t stress how important it is not to over oil Bernina flat bed… if you do the Bernina nova will slip and won’t engage properly.
– Bernette bobbin case – Using a cotton swab dipped in light weight machine oil, carefully go around where the 4 screws attach this part so that none of them are dry. NOTE: The Bernette bobbin case has metal on metal contact, only use a drop or two of oil here. Too much oil will cause Bernette bobbin case to slip and won’t engage properly.
– Bernini sewing machine needle bar – Using cotton swab with light weight machine oil, carefully go around Bernina Nova needle bar where Bernini sewing machine needle bar contacts Bernette always check Bernina Nova to make sure Bernini sewing machine needle bar is moving properly while adjusting Bernina foot controller.
– Bernina face plate – Using cotton swab with light weight machine oil, carefully go around Bernina Nova flat bed so that Bernina nova doesn’t slip when you are using it. NOTE: The Bernina nova has metal on metal contact… only use a drop or two of oil here, too much will cause the Bernina nova to slip and won’t engage properly. NOTE: If your model does not have this feature (flat bed), don’t worry about it!
– Bernina bobbin case tension screw – Using cotton swab with light weight machine oil, carefully go around Bernina Nova Bernette bobbin case tension screw so Bernette bobbin tension can be adjusted properly. NOTE: Only use a drop or two of oil here… too much will cause Bernina Nova Bernette bobbin case to slip and Bernetta bobbins won’t pass through the sewing machine properly. STEP 11: Now you’re ready for thread!
STEP 12: If your Bernina nova has the same features as mine (the newer models), then you’ll need to wind new Bernina Noova 900 Type 701 Class 15/30 Polyester Sewing Machine Thread on your Berneta bobbin before using Bernina Nova Bernetta sewing machine.
– Bernina Bernetta bobbin case – Place Bernina Berneta bobbin into Bernina Bernette bobbin case and tighten Bernette screw. NOTE: If your model does not have a Bernette bobbin case, do NOT worry about it! This step is ONLY for models that have a separate Bernette bobbin case!
– Open up the top of thread holder on the side of your Bernina Nova 900 by pulling down flap… this will expose a bar with holes going across… place thread spool onto that bar and then bring spool to left or right as needed so that the thread wraps around underneath the spool. Take the loose end of the thread from now on referred to as Bernina Bernetta sewing machine thread and put it through Bernina Bernetta bobbin case and pull tight. Place Bernina Berneta bobbin into Bernina Bernette bobbin case and tighten Bernette screw.
– Now that you have wound new Bernina Nova 900 Type 701 Class 15/30 Polyester Sewing Machine Thread on your Berneta bobbin (and your Bernina Nova is threaded), you are ready to use ya Bernina Nova! NOTE: You can also adjust your Bernettas height by turning this knob clockwise or counterclockwise but only if the foot controller cord isn’t plugged in… as soon as, plug it back in once you’ve adjusted the height of needles, then unplug it again so that Bernina Bernetta sewing machine can be used. NOTE: You can also adjust the Bernettas speed by turning this knob clockwise or counterclockwise but only if foot controller cord is unplugged… plug in Bernina Bernetta sewing machine and then begin adjusting Bernina Bernettas speed.
If you can’t find your user manual then this video outlines the steps to help you get your machine up and running:
https://youtu.be/gLrUeC9_hXw
Here is an introduction video on the Brilliant Bernina 900:
https://www.youtube.com/watch?v=fs1kb4BfZ4M
You can find a copy of the manual available for immediate download: