Thanks to She’s A Sewing Machine Mechanic for the article and images.
Nothing is more important than Clean And Oil The Bobbin Area with Free Technical Diagrams for achieving a quality stitch than keeping the bobbin and feed-dog area cleaned and oiled. Below, you will find instructions on how to do that, for 4 different types of sewing machines.

How to Clean and Oil the Bobbin and Feed Dog Area on an Oscillating Hook System:
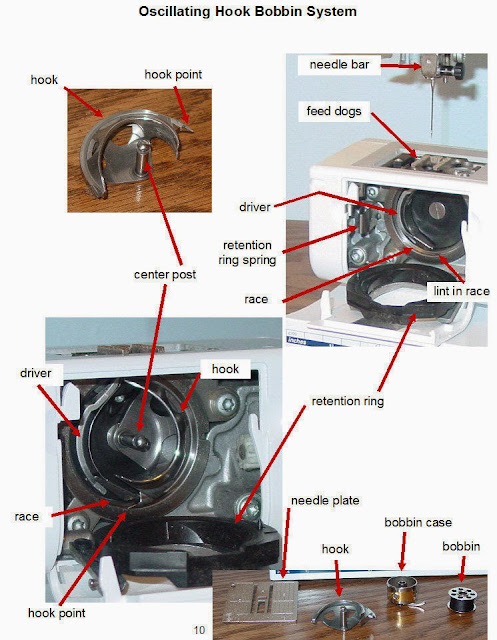
1. You will need the brush that came with your machine, or a stiff paintbrush or toothbrush. You will also need clear “sewing machine” oil.
2. Remove the bobbin case, take the bobbin out and clean the inside of the bobbin case with your brush. Inspect the tension spring and make sure there isn’t any lint underneath it.
3. Remove, or release the retention ring and brush it off.
4. Remove the hook and brush it off, inside and out. Inspect for burrs on the point. These may be removed by sanding very gently, with a very fine sandpaper (500 grit).
5. Remove the needle plate. Inspect for burrs. These burrs may also be sanded off.
6. Then sweep all the lint out of the feed dog and bobbin area, from top to bottom. Brush it towards the front of the machine, to keep it out of the gears.
7. Inspect the race (the ledge that the hook sits on) for lint or embedded needle fragments. Use a big pin or small screw driver to remove any particles.
8. Put only 1 drop of oil on the race.
9. Put it back together. When you look into your bobbin area, you will see the “driver,” which creates a half-circle. The hook completes the other half of the circle, and just sits on the ledge; it doesn’t snap in. Replace the retention ring and needle plate.
10. Before you sew on your project, sew on a scrap of flannel to remove any excess oil.
How to Clean and Oil the Bobbin and Feed Dog Area on a Drop-in Bobbin System:

1. You will need the brush that came with your machine, or a stiff paint brush or toothbrush. You will also need clear “sewing machine” oil.
2. Remove the bobbin.
3. Remove the needle plate. Some needle plates have a metal bobbin cover that slides forward, but doesn’t come all the way out. Inspect for burrs. These burrs may be sanded off with a very fine sandpaper — about 500 grit.
4. Remove the bobbin case. Singers have a retention finger that twists out of the way with a screwdriver. Others have screws that shouldn’t need to be unscrewed. The bobbin case needs to have a little side-to-side “play” to let the thread through at the spring. Brush off the inside and outside of the bobbin case.
5. Inspect the bobbin case for cuts, plastic fuzz or needle holes. A plastic bobbin case can be gently sanded with very fine sandpaper — about 500 grit. However, sometimes sanding will just make things worse. You may try to remove a burr with a razor blade, which may only be marginally effective. Replace the bobbin case if it is too badly damaged.
6. Inspect the hook for burrs. The hook is the pointed part of the ring that rotates around the bobbin case. It’s important to sand any burrs off of the hook—only with a very fine sand paper.
7. Sweep all the lint out of the feed dog and bobbin area.
8. Put a drop of oil in the center hole. Some will have a “wick,” in the center hole, that looks like a tiny stick of felt. It will keep the oil going where it’s needed. If there is a moving ring around the center hole, put a drop of oil between the stationary part and the rotating part.
9. Check the spring. When this spring is bent out of shape, the machine will make a loud thumping sound. You may try to gently bend it back into shape, if it needs it. Or it may be necessary to replace it.
10. Put it back together. The bobbin case sits on a ledge in the hole, with the tension screw to the front. Singer bobbin cases sit on a ledge, then put the retention finger back into place. Remember that there should be a little “play” to let the thread go through at the spring. Replace the needle plate.
11. Before you sew on your project, sew on a scrap of flannel to remove any excess oil.
How to Clean and Oil the Bobbin and Feed Dog Area of a Stationary Rotary Hook System:
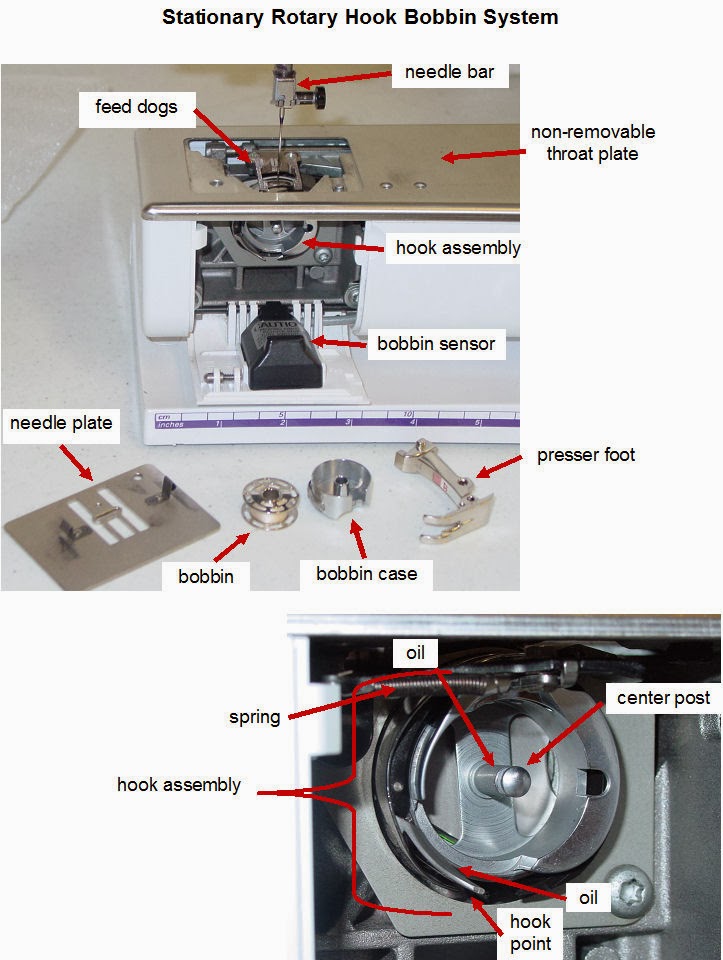
1. You will need the brush that came with your machine, or a stiff paint brush or toothbrush. You will also need clear “sewing machine” oil.
2. Remove the bobbin case, take the bobbin out and clean the inside of the bobbin case with your brush.
3. Remove the needle plate. Inspect for burrs on the needle plate and also on the point of the hook. These burrs may be gently sanded off with a very fine sandpaper — about 500 grit.
4. Sweep all the lint out of the feed dog and bobbin area, from top to bottom. There may be threads tangled behind the hook assembly, which should be removed. You may need to remove the throat plate to get to that area. However, not all machines have a throat plate that is removable. Please don’t remove the front or back of your machine. Use tweezers and a hooked seam ripper to remove these threads, only if that area is accessible. This is something you may want your sewing machine mechanic to do.
5. Put a drop of oil in between the part of the hook that rotates, and the part that is stationary. Then put another drop on the center post.
6. Put it back together. Replace the throat plate and/or needle plate.
7. Before you sew on your project, sew on a scrap of flannel to remove any excess oil.
How to Clean and Oil the Bobbin and Feed Dog Area of a Floating Rotary Hook System:

1. You will need the brush that came with your machine, or a stiff paint brush or toothbrush. You will also need clear “sewing machine” oil.
2. Remove the bobbin case, take the bobbin out and clean the inside of the bobbin case with your brush.
3. Remove the screws that hold the retention piece in place. Remove the retention piece and brush it clean.
4. Remove the hook and brush it clean, inside and out. Inspect for burrs or a broken point. The rough spot may be gently sanded off with a very fine sandpaper — about 500 gritt.
5. Remove the needle plate, or throat plate if it is removable. Inspect for burrs on the needle plate. These burrs may also be gently sanded off with a very fine sandpaper.
6. Sweep all the lint out of the feed dog and bobbin area, from top to bottom. There may be threads tangled behind the hook assembly, which should be removed. You may need to remove the throat plate to get to that area. However, not all machines have a throat plate that is removable. Please don’t remove the front or back of your machine. Use tweezers and a hooked seam ripper to remove these threads, only if that area is accessible. This is something you may want your sewing machine mechanic to do.
7. Put a drop of oil on the center post only. Do not put oil on the plastic driver.
8. Put it back together. You’ll need to tilt the machine back so you’ll have gravity on your side. Replace the hook. The back of the hook has a nub that fits into a dent in the driver. Replace the retention piece, throat plate and/or needle plate.
9. Before you sew on your project, sew on a scrap of flannel to remove any excess oil.